Video Conversion Guide
Use this guide to learn how to use ffmpeg and HandBrake, free open source tools, to convert hubble.gl renderings into different formats or different levels of compression depending on your use case.
For example, you may want a highly compressed MP4 to share quick drafts, you may want a loseless MP4 for video editing, or you want a highly optimized animated GIF.
This guide assumes you have no experience with ffmpeg, but are comfortable using a command line. If you would prefer to work in a GUI, follow the instructions for HandBrake.
HandBrake
HandBrake is a GUI powered by ffmpeg for converting video from nearly any format to a selection of modern, widely supported codecs. For hubble.gl users it is a quick and convenient way to convert a queue of WEBM videos to MP4.
Note: HandBrake does not support
GIForPNG/JPEGformats. Useffmpegto work with these formats.
Prerequisites
Install HandBrake.
WEMB to MP4
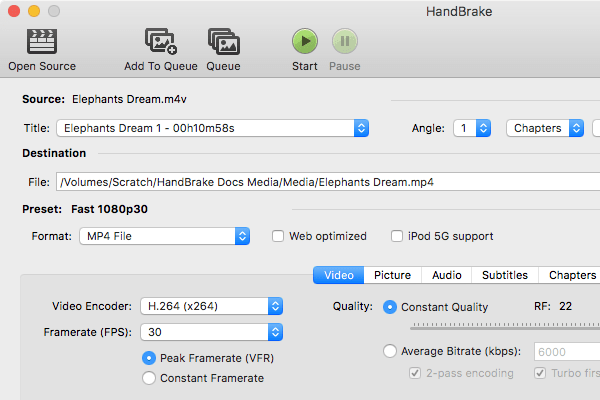
Open HandBrake and follow prompts to open your WEBM file.

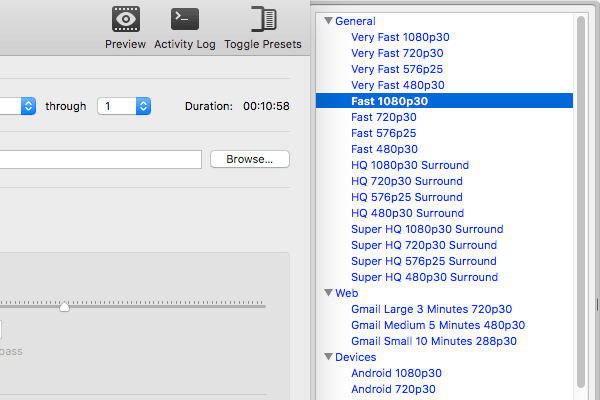
HandBrake comes with a variety of presets for common quality and resolution settings. Simply pick one from the dropdown and click "Start" in the toolbar, or "Add to Queue" if you're setting up multiple conversions.

Screenshots courtesy of HandBrake
FFMPEG
If you've encoded a lot of media before, you've likely encountered ffmpeg. If this tool is new to you, here's how the ffmpeg project describes their tool:
“FFmpeg is the leading multimedia framework, able to decode, encode, transcode, mux, demux, stream, filter and play pretty much anything that humans and machines have created. It supports the most obscure ancient formats up to the cutting edge.”
Needless to say, this guide only scratches the surface of what you can do with ffmpeg and makes no attempt to teach in detail what each command is doing - it serves more as a recipe book. The tool is well documented and there are endless tutorials onine to really grok whats going on. If you want to learn more, we highly recommend the article about GIF optimization on the GIPHY Engineering Blog, or reading the H.264 Encoding Guide published on the project wiki.
Prerequisites
Install ffmpeg locally, or use ffmpeg.wasm in your browser.
This guide references variables for inputs and outputs. For convenience, here are a bash helper we commonly use to place the output file next to the input file:
input="$1"
filename="$(basename "$input" | sed 's/\(.*\)\..*/\1/')"
folder="$(dirname -- "$input")"
WEBM to MP4
# Default settings, high compatibility.
ffmpeg -i $input -c:v libx264 -vf format=yuv420p "$folder/$filename.mp4"
Note: Change compression and qualtiy settings using
-presetand-crf.
# High compression, high quality, slow encoding speed.
ffmpeg -i $input -c:v libx264 -vf format=yuv420p -preset veryslow -crf 17  "$folder/$filename.mp4"
# Near loseless, fast.
ffmpeg -i $input -c:v libx264 -vf format=yuv420p -preset ultrafast -crf 1  "$folder/$filename.mp4"
WEBM to GIF
# Outputs at 10fps, optimizes color palette.
ffmpeg -i $input -filter_complex "[0:v] fps=10,split [a][b];[a] palettegen [p];[b][p] paletteuse" "$folder/$filename.gif"
# Increase fps to 20 for less-choppy but larger file.
ffmpeg -i $input -filter_complex "[0:v] fps=20,split [a][b];[a] palettegen [p];[b][p] paletteuse" "$folder/$filename.gif"
PNG or JPEG sequence to MP4
To convert the images to an MP4, unzip the archive into a folder. You'll need to specify the framerate using the -r flag, since ffmpeg does not infer this.
Note: Change the input extension to
.jpegif you're using that format.
# Near loseless, fast with 60fps input.
ffmpeg -r 60 -f image2 -i "$input/%07d.png" -c:v libx264 -vf format=yuv420p -preset ultrafast -crf 1  "$folder/$filename.mp4"
Note: Change compression and qualtiy settings using
-presetand-crf, same as WEBM to MP4.
PNG or JPEG sequence to GIF
# Outputs a 30fps input to 10fps to reduce size, optimizes color palette.
ffmpeg -r 30 -f image2 -i "$input/%07d.png" -filter_complex "[0:v] fps=10,split [a][b];[a] palettegen [p];[b][p] paletteuse" "$folder/$filename.gif"
# Outputs a 30fps input to 10fps to reduce size, optimizes color palette.
ffmpeg -r 30 -f image2 -i "$input/%07d.png" -filter_complex "[0:v] fps=30,split [a][b];[a] palettegen [p];[b][p] paletteuse" "$folder/$filename.gif"
Note: You can trim the beginning with
-start_number. i.e. Start at0001234.pngwith-start_number 1234.
# Scale the output to 300px wide while maintaining aspect ratio.
ffmpeg -r 30 -f image2 -i "$input/%07d.png" -filter_complex "[0:v] fps=10,scale=300:-1,split [a][b];[a] palettegen [p];[b][p] paletteuse" "$folder/$filename.gif"
Common Problems
Error: "height not divisible by 2"
.h264 needs an even resolution, but there's nothing that prevents hubble.gl from exporting an asset with an odd dimension. You can fix this within a filter (-filter:v or -filter_complex) that converts it to an even resolution you specify.
# Example
-filter:v "scale=2560:1440:force_original_aspect_ratio=increase,crop=2560:1440"
# Input: 2559 x 1440
# Scale up while maintaining aspect ratio
# Crop to 2560 x 1440
Tip: Pick a resolution close to the original to preserve quality.